The Middle East
The Battle Of Medenine
Until the receipt of this order at Eighth Army Headquarters, the 7th Armoured Division had been steadily, but slowly, leading the advance along the main coast road beyond Ben Gardane, much hampered by extensive minefields laid under the energetic direction of Generalleutnant Buelowius. On the 17th February the 12th Lancers and the Queen’s Brigade reached Nefatia, but then had to wait for a day whilst the Royal Engineers cleared the road ahead. On the 19th the 22nd Armoured Brigade halted within three miles of Medenine and the Queen’s battalions debussed before advancing on the town and successfully clearing it of the enemy. In the evening two recce patrols from ‘C’ Company, 1/5th Queen’s, under Lts H. Sanctuary and J.R. Morrison-Scott, went out to Metameur, bringing back the information that it was free of the enemy. Consequently the Brigade occupied a position around that village, but found the area to be so heavily mined and booby trapped that no troops were allowed into the wadis or near buildings. The next day 22nd Armoured Brigade occupied the Tadjera Khir, including the main hill of this feature, which became known as Esenborough Castle with its white villa on the top. This was a tactically important acquisition as it provided excellent observation across the plain to the Matmata Hills. The Queen’s Brigade took over this feature and the general area north and west of Metameur on the 22nd February, and was consolidating this position when Alexander’s order became generally known.
Although his administrative arrangements were far from complete, Montgomery ordered his only two leading divisions, the 7th Armoured and 51st Highland, to push forward right up to the Mareth Line and, if possible, scare the enemy out of it. He also ordered up the 201st Guards Brigade with all speed and placed it under command of 7th Armoured, and issued warning orders to the 2nd New Zealand Division, the reequipped 8th Armoured Brigade and the 23rd Armoured Brigade to be ready to move up as and when necessary. The 4th Light Armoured Brigade had once again been placed under command of the New Zealanders. On the 26th the 51st (Highland) Division took over from the Queen’s Brigade on the Tadjera Khir, and the Queen’s then made a night advance and occupied the high ground of Zemlet El Lebene and Kef Abdallah about four miles north-west of the Tadjera Khir. The next day the 201st Guards Brigade took over the Tadjera Khir positions, and the 51st Highland came up on the Queen’s Brigade’s northern flank. Although the German 90th and 164th Light Divisions with four Italian divisions were already in the Mareth Line, these final manoeuvres by 7th Armoured and 51st Highland significantly influenced Rommel's
decision to break off the attacks at Kasserine.
However, this was a worrying time for the Eighth Army, which now found itself dangerously unbalanced, and would remain vulnerable until the New Zealanders could be brought up. So the last days of February and the first days of March was an anxious period. Luckily for the Allies, the Axis command structure was showing signs of severe tension at this time. Rommel, who by now was no longer a fit man, suffering from both mental and physical exhaustion besides jaundice, still retained his appointment as C-in-C Armee Gruppe Afrika, but he had been replaced by the Italian General Giovanni Messe as commander of the Panzerarmee Afrika; indeed the army’s title had been changed to the First Italian Army. Rommel, Messe, Ziegler, who commanded the Deutsches Afrika Korps, and the commanders of the 10th, 15th and 21st Panzer Divisions could not agree on a plan of attack. Rommel was almost alone in believing that the Mareth Line was not invulnerable from an outflanking movement around the Matmata Hills, but the others thought that the Eighth Army could be destroyed in front of Mareth. Eventually on the 2nd March Messe, who would be in tactical control of the battle, started to issue his orders for an attack on the positions held by 51st Highland and 7th Armoured. The operation was planned for the 6th March, and would involve two thrusts. In the north the Italian Spezia Division and Panzergrenadier Regiment 200 from 90th Light Division was to make a frontal assault on Zemlet El Lebene, while the Afrika Korps, employing all three panzer divisions, would aim for a breakthrough at Metameur before swinging north-east and north to link up with the Spezia battle group. The two British divisions could then be destroyed in detail. Fortunately the gist of these plans was intercepted by Ultra, so Montgomery was able to stick to his original timetable to bring up the 2nd New Zealand Division into the area covering Metameur and Medenine on the 4th. He also brought 23rd Armoured Brigade up behind the 51st Highland and placed 8th Armoured Brigade in reserve behind 22nd Armoured Brigade, which remained in support of the Queen’s Brigade.
These positions were mostly in full view of the enemy occupying the hills five miles away, so they could be occupied only by a screen during the day while the rest of the battalions were held back in the dead ground until night, when there was active patrolling and arduous digging to improve the positions. There was spasmodic shellfire and increased enemy air activity, but morale increased considerably when a Messerschmitt Bf 109 had its tail shot off by a Bofors. On the 4th March another Bofors team capped that achievement by shooting down two enemy planes with one shell! Particular care was paid to the siting of the anti-tank guns, especially the recently acquired 6pdrs. During this period Lt Col Bill Kaulback, commanding 1/6th Queen’s, was wounded and the OC 476 Battery RA was killed by a shell which fell on their OP. Major Archie Wilson again assumed temporary command of the Battalion.
The Queen’s Brigade was drawn up with all three battalions forward. 1/5th Queen’s was on the Brigade’s right with ‘D’ Company on the Kef Abdallah in touch with the 1st Black Watch of 154 Brigade on their right. ‘C’ Company occupied a reverse sloop position behind Point 214 on the Zemlet El Lebene feature, with ‘A’ Company in reserve covering the narrow El Hararza Pass and its track running up from the southwest. ‘B’ Company was in the gap between ‘D’ and ‘C’ Companies. 1/7th Queen’s, with only three companies, occupied the centre of the Brigade front between the El Hararza Pass and the wide Wadi Hallouf, which followed the line of another track coming up from the south leading from the Hallouf Pass. In the centre of the 1/7th Queen’s position was another wadi, the Wadi Negueb, which divided their frontage. ‘B’ Company, under Capt Stuart Playfoot, covered El Hararza track while ‘C’ Company held the high ground between the wadis, and ‘A’ Company was posted between Wadi Negueb and Wadi Hallouf. Two troops of Royal Artillery 6pdrs were allocated to ‘B’ Company in addition to two detachments of the Battalion’s mortars, while ‘A’ Company was given all four of the Battalion’s 6pdrs. The 2pdr anti-tank guns were sited further back towards the heads of the wadis to give depth where their shorter range would be more effective. On the left of the Brigade was the 1/6th Queen’s with on their left the 2nd Scots Guards and beyond them the 3rd Coldstream. An unnamed wadi separated the 1/6th from the 201st Guards Brigade. ‘B’ Company held some high ground just south of Wadi Hallouf on the Battalion’s right whilst ‘A’ Company was forward left in touch with 2nd Scots Guards. The reserve company, ‘C’ Company, was posted on a low hill near the head of the unnamed wadi about 1,000 yards to the rear.
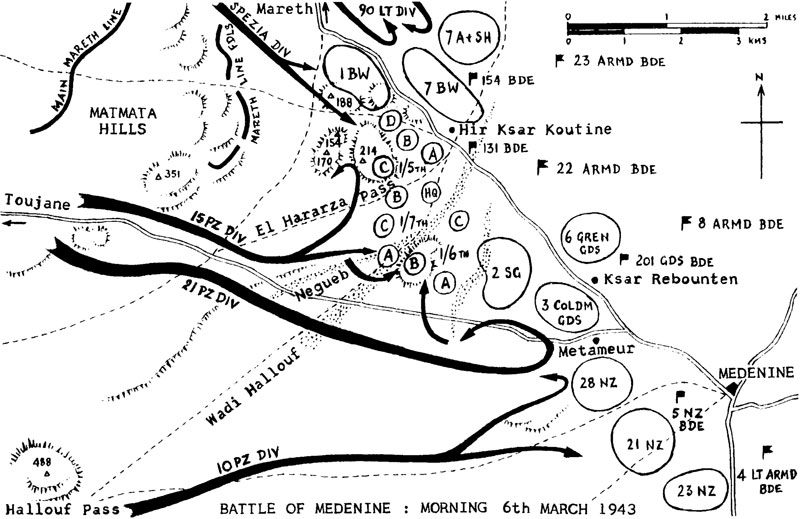
Battle of Medenine.
(Click to enlarge)
Stuart Playfoot has given a vivid description of the preliminaries and the start of the battle of Medenine. “The ground we were told to occupy was within these hill features covering a couple of wadis; a very wide one on the left of our 7th Queen’s battalion and a much smaller one on the right, which was in fact my company area. This was in a bit of a saddle between two hill features. We had our own platoon of anti-tank guns, that’s eight, within the Battalion, and I was given a battery of Royal Artillery anti-tank guns, who I don’t think actually fired a shot because we didn’t in fact get any tanks into my company area. The Royal Engineers helped us, because they dug pits and weapon pits and so on for the guns with bulldozers and things of that type, which took about 10 days. We had no mines, so we made dummy mines with tin cans and buried them, and built a little pile of sand over the top to make it look as if there was something there.
And it was about 6 o’clock in the morning of the 6th March ‘43, a very, very misty morning, very misty indeed, and the first thing one knew was that you could hear this rumble of engines way, way, way in the distance towards what later became to be known as the Mareth Line. We had already been standing-to since about half-past four, because it was anticipated that this was going to be the day, or the next day anyway, so we were all armed to the teeth, standing there and waiting for them. I had two mortars attached to my company, and we had an OP up on one of the features. So I went up there with them, and from there one was able to see the whole battle ranging out in front of one. The tanks switched away to my left, in fact went to the very big, wide wadi. The infantry switched away to my right towards the 1/5th Queen’s, because I was the right hand company of my Battalion. It so happened that there was a big dip away over there towards the 5th Queen’s, between them and me, and much earlier on, with my two mortar sergeants, I had agreed that this was a possible danger area, because it was completely hidden from view, and we had in fact ranged it with our mortars. So when we saw the infanteers going in there, we really opened fire. They recorded to me that they fired 140 bombs; well, it must have done an awful lot of damage. Certainly as far as I am aware, no infantry ever got into ‘C’ Company, 5th Queen’s. Our morale was tremendous when we realised we were as safe as houses in this big rocky feature. Our morale was sky high because we were quite confident that we, in this very strong position, were going to beat off this attack. We, in my company area, only had machinegun and artillery fire coming at us, and fortunately no real serious damage whatsoever all day long. The big action, of course, was away on the left flank, which we didn’t know about until a bit later on in the day. But by and large we were cock-a-hoop that this was a fantastic show as far as we were concerned.”
The rumble of engines which Capt Stuart Playfoot had heard through the early morning mist had been the 15th and 21st Panzer Divisions emerging from the hills down the Toujane road, and he had then witnessed the 15th Panzer’s Panzer Regiment 8 turn off towards the Wadis Negueb and Hallouf, whilst its Panzergrenadier Regiment 115 headed for Point 214. Meanwhile the 21th Panzer had continued down the Toujane road, brushing aside a carrier patrol of the Scots Guards, until they came to a dummy minefield in front of the 3rd Coldstream Guards. 10th Panzer debauched from the Hallouf Pass and drove directly at Medenine towards the New Zealanders. Shortly afterwards the panzergrenadiers of the 90th Light Division advanced on the 7th Argylls and 7th Black Watch of 154 Brigade from the north-west, alongside the Spezia Division, who came on towards the 1st Black Watch and ‘C’ and ‘D’ Companies, 1/5th Queen’s. Although supported by some heavy artillery fire, these infantry attacks had to come a long way across the open plain and the British artillery, with the machine-gunners of the 7th Middlesex, had a field day, inflicting heavy losses. The survivors reached the foot of the hills and dug in.
On the other flank the leading tanks of the 10th Panzer Division began to file up a wadi which led to the positions of the 28th Maori Battalion, the right hand battalion of the 5th New Zealand Brigade. When they got to within 400 yards two 6pdr anti-tank guns opened fire, and in quick succession knocked out four tanks, with mortars claiming a fifth by blowing off the tracks. Unable to locate where the New Zealand fire was coming from, the German tanks withdrew, leaving their accompanying infantry stranded, who were then severely mauled by artillery fire. Opposite 201st Guards Brigade the 21st Panzer Division was tricked by the dummy minefield, and turned north, consequently presenting themselves broadside on to the 6pdrs of the 2nd Scots Guards, who knocked out twelve tanks and seriously damaged three others. However, it was the attack of the 15th Panzer Division on the centre of the Queen’s Brigade which provided the most spectacular action of the day. Capt E.G. Sandys, the Anti-tank Platoon Commander of 1/7th Queen’s, gave the following account:-
“Just in front of our positions the German armour appeared to split into two columns - one directed on 7 Platoon of ‘A’ Company, 1/7th Queen’s, and the other towards 1/5th Queen’s, together with their Panzer Grenadiers. It was at this stage that the enemy tanks came into sight of Sgt Andrews’ No 5 anti-tank gun. Knowing the anti-tank layout to be mutually supporting, and thank goodness he remembered his fire discipline, Sgt Andrews allowed the first four German tanks to proceed along the track and then engaged the fifth tank (a Mark III). He scored a direct hit with his first shot and stopped the tank. He then put four more shots into it and this caused the crew to bale out. He then switched to the following tank (a Mark IV) and put that out of action - with the crew also baling out. Sgt Andrews then quickly switched to the leading tank, which obviously by this time did not know quite what was happening, and scored a direct hit on it and stopped it, which meant that he had all the other following tanks bottled up. He then systematically
destroyed the other tanks so that in a very short space of time he had a score of six knocked out German tanks. It was a splendid piece of anti-tank shooting and the fact that Sgt Andrews held his fire for the correct time was most gratifying to us all. Witnessing the plight of the leading tanks, about a dozen of the following tanks swung south and some selected hull-down positions on the immediate flank of ‘A’ Company and were able to bring down both anti-tank and withering machine-gun fire across the battalion area, whilst they themselves were partly defiladed from our own anti-tank fire. This fire was very heavy and, together with shelling from the German artillery, the situation was most unpleasant and severely restricted movement. In fact I recall that not one unwise head was seen above ground during this outburst!
Nevertheless Sgt Andrews spotted the origin of the tank fire and took up the challenge. Having gone into hull-down positions, the targets presented were, however, very small indeed and during this encounter the parapet of his gun was demolished. Sgt Andrews ordered his crew to take cover whilst he continued to load and fire the gun himself. He disabled two further tanks, which at the time caused a grave threat to ‘A’ Company’s positions, and prevented the Germans from entering the vital Wadi Negueb.
At the same time infantry were advancing on all company fronts, but when engaged they went to ground about 1,000 yards from our positions, when they were again engaged by both artillery and mortar fire with devastating results, and made no further organised advance on 1/7th Queen’s front. Artillery also had some magnificent targets at infantry debussing points.
Meanwhile, the German armour, having been driven south by the effective fire of Sgt Andrews’ gun, reformed and made probing attacks. They entered Wadi Hallouf, in which Sgt Crangles’ gun (No 7 gun) was sited. The tanks were immediately engaged by Sgt Crangles, Sgt Vincent (No 8 gun) and the right anti-tank gun of 1/6th Queen’s. One was immediately knocked out by Sgt Vincent and another by Sgt Crangles, but at this point another tank further up the wadi fired on Sgt Vincent and the anti-tank gun of 1/6th Queen’s and knocked both guns out.
Further German tanks entered Wadi Hallouf and at a range of little over 200 yards Sgt Crangles engaged them with great rapidity. At the same time his Bren gunner kept up a rapid rate of fire to prevent the tank commanders from observing from their turrets. In a short space of about half an hour Sgt Crangles knocked out 14 tanks at very short range. During this encounter he fired 40 rounds of AP shot with great rapidity until the gun was eventually put out of action with a direct hit on its recuperator. At this stage Sgt Crangles ordered his crew to fix bayonets and he himself took over the Bren gun. However three more German tanks had infiltrated through the wadi and, since there was now no effective anti-tank fire to contain them, they were able to overrun 10 Platoon of 1/6th Queen’s on the far bank. They also surrounded and winkled out the gun crews of Sgt Crangles and Sgt Vincent, who only gave up because they realised further resistance was impossible. I saw them being marched away by the German Panzer Grenadiers, but it was impossible to bring down any fire for fear of causing casualties to our own men. The German armour in the meantime had been severely mauled and there is no doubt that the gallant fight put up by Sgt Crangles and his gun crew was a determining factor in stopping the initial breakthrough at this point.”
On the 1/6th Queen’s front the pressure was felt rather later in the morning and came from a different quarter. Having taken heavy casualties in front of 2nd Scots Guards, the 21st Panzer continued to try to feel its way forward on its northern flank, and eventually at about 10am eighteen Mark IV Special tanks formed up with several companies of panzergrenadiers and delivered an attack head-on to the 1/6th front. Most of the tanks were stopped by defensive fire some distance from the Battalion’s forward defence localities, but a number managed to reach and take cover in some of the many small wadis leading into the 1/6th positions. Eventually the situation was stabilised, thanks to the most efficient liaison between the forward companies and the supporting artillery, especially with the 408th Battery. Many of the panzers were either immobilised or destroyed by this accurate fire. After this attack was repulsed there was a pause along the whole brigade front, although the artillery and the forward companies were kept busy engaging enemy already on their front and preventing damaged tanks from being recovered or repaired.
At about 2pm a warning was received from Brigade Headquarters that a wireless intercept indicated that further attacks could be expected. Within half an hour of this warning renewed attacks started to develop in front of 1/6th Queen’s, and there was also an attempt to again force the Wadi Hallouf. The survivors of the morning attack in the wadi were reinforced, and at the request of ‘A’ Company, 1/7th Queen’s, fire from both 146th Field and 69th Medium Regiments RA was brought down on DF task M.90. Seven of the panzers started to advance, but one blew up, and the others found the fire so intense that they withdrew and made no further attempts to attack. Later in the afternoon a squadron of Shermans from the 1st Royal Tank Regiment moved into the wadi to engage this remnant and knocked out a further seven panzers.
The attacks on 1/6th Queen’s were rather more persistent. Large numbers of vehicles came up and could be seen unloading infantry, but the defensive fire was so heavy that no infantry and few tanks got through it. This attack was completely checked with very heavy casualties inflicted on the enemy. At about 4pm the only air attack of the battle took place when 18 Stukas attempted to dive-bomb the 1/6th Queen’s, but the flak put up by the divisional anti-aircraft artillery was so effective that the Stukas never came down to their normal bombing height, and their bombs fell quite harmlessly. Finally a third tank and infantry attack was made up the wadi between ‘A’ Company, 1/6th Queen’s, and the 2nd Scots Guards as part of a general assault by 10th Panzer on the 201st Guards Brigade and the New Zealand Division, but this was stopped by artillery fire and anti-tank fire from tanks in hull-down positions.
During the afternoon the Spezia Division renewed its assault combined with heavy shelling and mortar fire. The main attacks were directed against ‘D’ Company, 1/5th Queen’s, and by late afternoon they were in danger of being overrun. A platoon of the 1/7th Queen’s with the 1/7th’s Carrier Platoon went to their direct assistance whilst Capt V.G. Tweedie took the 1/5th Queen’s carriers to shoot up Point 188, from which the enemy was causing ‘D’ Company much discomfort. It was clear that the enemy’s intention was to infiltrate on to the high ground and so dominate the Battalion’s positions. Accordingly ‘A’ Company and a company of the 1st Black Watch went out and cleared the high ground around Points 188 and 154. During this operation Lt B.T. Opperman was reported missing, his body being found after the battle. A message from Capt L.J. Pound of ‘D’ Company stated that things were still serious, and that he had only 20 men left. As a result it was arranged that ‘C’ Company, 1st Rifle Brigade, would come under command 1/5th Queen’s that night; and in fact at midnight the Rifle Brigade company relieved ‘A’ Company, and ‘A’ Company set off to relieve ‘D’ Company. However, when ‘A’ Company arrived at ‘D’ Company’s position it was found that ‘D’ Company had stabilised the situation by some hard close quarter fighting, and in reality their casualties were only two killed and ten wounded. They had also captured 14 prisoners of the Panzergrenadier Regiment 115. ‘D’ Company went back as the reserve company, and ‘C’ Company, 1st Rifle Brigade, rejoined their own battalion.
In the early evening an Italian platoon captured Point 170. On occupying this feature the Italian infantry danced and cheered with wild enthusiasm. Again Stuart Playfoot described the scene:-
“At last light odd fires were out ahead of us burning up. They were still vehicles burning, in other words, and it gradually got quiet. There was a little bit of an action away to our right in 5th Queen’s area. We could see from my company area some chaps dancing about on the top of a hill; I think it was Point 170. My secondin-command, who was in fact a mortar officer, or had been, and he suggested that we might have a shot at these chaps, so we did. We sighted the two mortars, or he did, and fired there, and as far as we could see we did actually get bombs to land in or around the top of that point, and these chaps disappeared, certainly. It was reported latter that there were chaps on Point 170, and they were destroyed by mortar fire, so it could well have been that it was ours!”
The night was wet and cold. The quiet was broken by the noise of vehicles moving about in front of the Queen’s and Guards Brigades’ positions, and patrols reported that the enemy were trying to salvage some of their less damaged tanks and half-tracks. Calls were made on the artillery to bring down fire on these recovery parties from time to time. Well before dawn the battalions stood-to prepared to receive a renewed assault, but the Germans and Italians had pulled out all along the front. General Cramer, who had taken over command of the Afrika Korps just before the battle, had suggested breaking off the attack and Rommel had agreed. Three days after the battle Generalfeldmarschall Rommel left Africa to try to persuade Hitler to agree to an evacuation of Tunisia, but Hitler was deaf to all argument and ordered him to relinquish command and go on sick leave.
At first light it was revealed that within a few hundred yards of the Queen’s Brigade positions the ground was littered with disabled and abandoned tanks and vehicles, twenty-seven tanks in front of the 1/7th Queen’s alone. It was thought that Nos 5 and 7 guns between them knocked out 22 panzers, a record for the Eighth Army, and comparable with the action of the 2nd Rifle Brigade at ‘Snipe’ during the battle of El Alamein. Both Sgt R.I. Andrews and Sgt J.F. Crangles were awarded the DCM for their astonishing performances. Sgt lvor Andrews’ gun was later refurbished and presented to the Regiment as a trophy, and was placed beside The Keep at the Regimental Depot in Stoughton Barracks, Guildford. It then went to Bassingbourne Barracks for many years before being exhibited permanently in Howe Barracks, Canterbury, where it remains to this day. General Montgomery sent a message which simply said “Well done the Queen’s” and indeed he was later to write that Medenine was his most successful defensive battle.
The Germans admitted to losing 52 panzers out of the 150 which took part in the attacks, and there must have been countless infantry losses. British losses were very few. The 1/5th Queen’s lost Lt Opperman and two men killed, with Capt G.L. Lilly, Lt K.H. Wheeler and a number of other ranks wounded; the 1/6th had 2 men killed, 7 wounded and 20 missing (mostly from those captured in 10 Platoon); and 1/7th lost one man killed, 9 wounded and 10 missing (Sgt Crangles’ and Sgt Vincent’s gun teams). The losses suffered by 51st (Highland) Division, 2nd New Zealand Division, and 201st Guards Brigade were on a comparable scale.
The 7th March was spent in cleaning up the odd pocket of Germans or Italians still left on the high ground or in the wadis, particularly in the area of the 1/5th Queen’s. Spasmodic shelling continued and there were one or two casualties. Capt Ted Kilshaw, OC ‘A’ Company, 1/6th Queen’s, with Capt W.L. Johnson went out and finished off a number of enemy vehicles and tanks with petrol and sticky bombs. The Brigade was finally stood down at about 10.30am on the 8th March, and was extremely glad to be given a week’s rest, having been in the forefront of the advance, and most of that time in action, for the previous six weeks.
Lt Col N.D. Leslie, late of the Cameron Highlanders in 51st Highland, took over command of 1/5th Queen’s from Lt Col Lance East, who had commanded since September 1941, and before that had served with the Battalion since 1937 as the Adjutant and then subsequently as Battalion 2i/c. The award of the DSO in recognition of his fine work in command was warmly endorsed by all who had served with him. Lt Col R.N. Thicknesse of the Royal Ulster Rifles took over the 1/6th from Archie Wilson. Montgomery visited the Brigade, congratulated them again, and said that it was a particularly good show, especially as it was the first time that infantry without wire, mines, and very little tank support had repulsed an attack by panzer divisions.
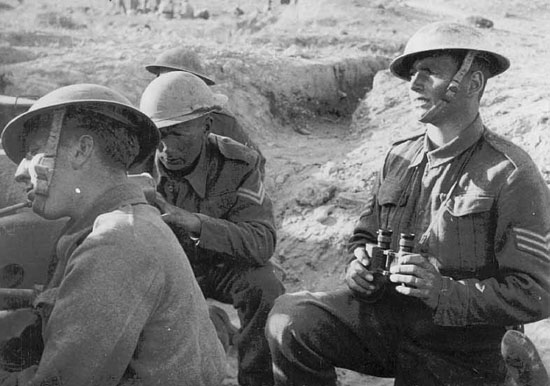
(Right to Left) Sgt Andrews, DCM; Cpl Brenton; another manning their 6 pdr gun.
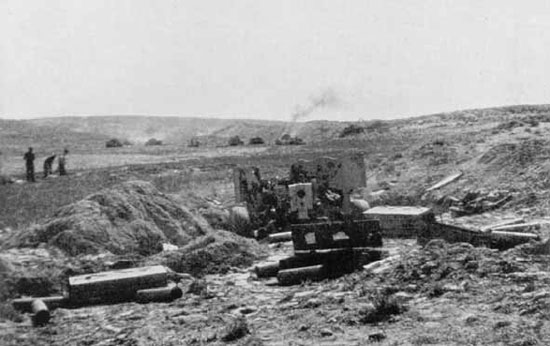
View from behind Sgt Crangles gun on the morning after the Battle of Medenine, 7th March 1943.
« Previous ![]() Back to List
Back to List ![]() Next »
Next »
Related
